

Default Clip Could Not Be Found In Attached Animations List
How to create Blender shape key animations and import them in UE4 as morph target animations
by Arthur Ontuzhan
Posted 2 years, 1 month ago
Last edit 2 years, 1 month ago
Share on
Table of contents
- Introduction
- Prerequisites
- Creation of shape key animations in Blender
- Project setup
- Creation of the animations
- Making animations exportable
- Exporting animations
- Importing animations in UE4
- Short version
- Video
Introduction
Shape keys/Morph targets are used to deform object vertices into different shapes. In game development they are commonly used to animate character facial expressions or how they talk. In this tutorial I will show you how to make shape keys in Blender, animate them and then import them in Unreal Engine 4 as morph target animations.
If you're feeling good with the blender there's a short tutorial version here.
Also, there's a video if you have difficulties to understand some parts.
Prerequisites
- Blender 2.8 or newer installed.
- I am using Unreal Engine 4.23, but older versions also should work.
- Basic knowledge of how to use Blender and UE4.
Creation of shape key animations in Blender
Project setup
As usual, we need to start with empty Blender project.
- I usually do that by once pressing A key, then pressing X and then accepting deletion by hitting Enter or by a mouse click.
- Or you can do it your way.
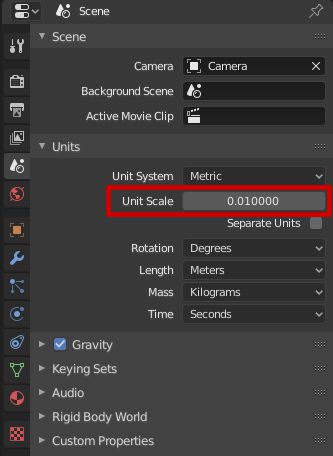
After we have a clean empty project, we must change the scene Unit Scale to 0.01.
- We can find Unit Scale in the bottom right side of the Blender window. There we should select Scene tab, expand Units section and we will see Unit Scale value, which by default is 1. Also, make sure that the Unit System is set to Metric because UE4 uses the metric system.
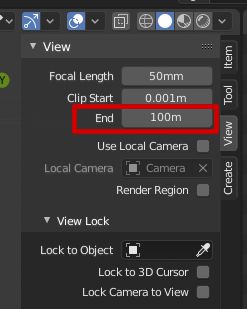
Now our project matches UE4 scaling, and now we will see that in 3D viewport we can't see objects in the further distance. To fix that we will increase Clipping distance.
- To increase 3D view Clip End distance, we need to press N key, which will open the properties menu on the top right corner of the 3D viewport. There under the View section, we will see the End value, which will be set to 10m. I usually set it to 100m, because I am too lazy to add more zeros. Most of the time 100m is enough for me to move a camera around. If this distance is not enough for you, you can always increase it, by default it's set to 1000m.
Creation of the shape keys
At first we need mesh to which we will add shape keys. For that we will use Suzanne mesh.
- Add Suzanne mesh - press Shift + A and then in Mesh sub-menu select Monkey.
- Move it higher - press G then Z and type 1, press Enter.

Now we can add a few shape keys to our mesh.
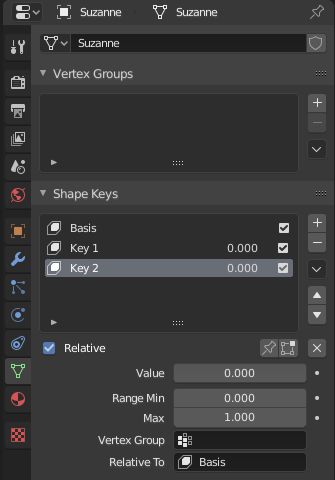
- Make sure that mesh is selected and then in properties tab open Context tab and press + button in Shape Keys section.
- Now we have Basis shape key, now click the same + button so many times as many shape keys you want for your mesh. I will press the button 2 more times.
Now we need to add some transformations to our shape keys, so we could use them to change the mesh.
- While in the object mode select shape key for which you want to add transformations.
- Go to edit mode (you can switch between modes by pressing Tab) and do transformations to the mesh.
- Switch back to object mode and by moving value slider in the Shape Keys panel, you should see the effect of the shape key transformations.
I'll add one shape key to control height of eyebrow area of the Suzanne and another one to control how wide is Suzanne mouth open. If you decided to use your own transformations to shape keys, you can skip to animation creation part or just follow along how I did my shape key transformations.
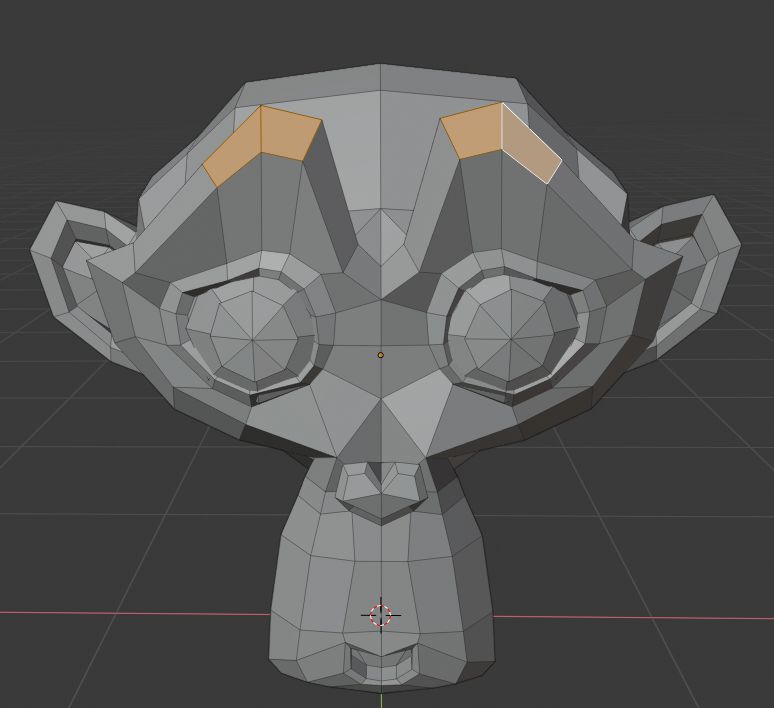
My first shape key will be for controlling the height of the eyebrow area.
- Select first shape key (if you didn't rename your shape keys it should be named Key 1 by default) in the Shape Keys section while in the object mode.
- Press Tab to enter into edit mode.
- Press 3 to have face selection active and by holding Shift key with left mouse button select faces which are shown in an image above.
- When you have faces selected press G to start moving faces and then press Z to move faces along Z-axis. Move axis a little bit higher and accept transformation by left mouse click or by pressing Enter.
- Now you can go back to object mode by pressing Tab and move Value slider in the Shape Keys section to see the effect of the shape key.
The second shape key will be to control how wide is mouth open.
- Select second shape key (if you didn't rename your shape keys it should be named Key 2 by default) in the Shape Keys section while in the object mode.
- Press Tab to enter into edit mode.
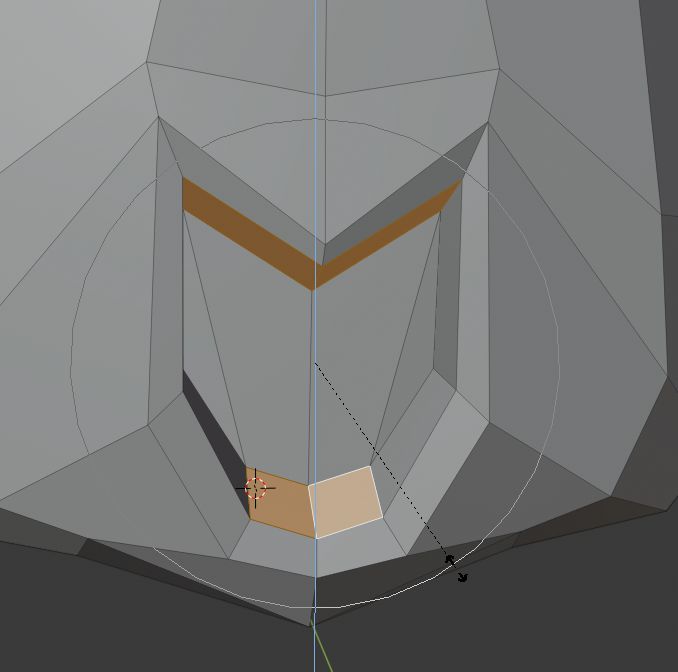
- Press 3 to have face selection active and by holding Shift key with left mouse button select faces which are shown in an image above.
- Enable Proportional Editing by pressing O key.
- Press S key to start scaling faces and then press Z key to lock scaling to Z-axis.
- Use Mouse Scroll to set Proportional Editing affection area circle like in an image above and then open mouth so it would be wider and accept transformation by left mouse click or by pressing Enter.
- Now you can go back to object mode by pressing Tab and move Value slider in the Shape Keys section to see the effect of the shape key.
Now we have our shape keys setup and we can proceed to make animations with them.
Creation of the animations
If you have imported shape keys from Blender into Unreal Engine before, you might have seen, that UE4 morph target weight slider's range is set from -1 to 1. But for Blender by a default value range is set from 0 to 1. It's an optional step, but let's change our shape key value range so it would match with UE4 ranges.
- Select shape key in the Shape Keys section.
- Change Range Min value to -1.000.
- Repeat previous steps for other shape keys.

Now we can create shape key animations. We will do that in an Animation workspace.
- At the top of the Blender window switch to Animation workspace.
- Now you might see that both 3D viewports aren't showing anything. They are just too zoomed in, just zoom out in them until you see your mesh.
- It's optional, but you may want to increase Clip End distance as we did in the project setup part if your mesh is too big and gets clipped out of the view.
Now our workspace should be ready for creating shape key animations. Let's start by creating our first shape key animation.
- In timeline switch editing context from Dope Sheet mode to Shape Key Editor.
- Make sure that your Current Frame is set to 1 and then in the timeline set your chosen shape key value to your desired value, I chose Key 1 shape key and set its value to -1 and for Key 2 I set the value to -1.
- Set Current Frame to 30 and then in the timeline set your chosen shape key value to different value. I chose Key 1 shape key and set its value to 1.
- For me, my animation is done. You can add more keyframes to it and make it longer. Now in the timeline press Push Down button to finish the animation.
- Now in the timeline, you can press on New button and make another animation, or just start to add values to keyframes and it should automatically make new animation.
For the second animation at first frame, I set Key 1 value to -1 and Key 2 value at 1. And as last frame, I chose frame 20 and at it I set Key 2 value to -1.

In the image above you can see how the first shape key animation should look like before you press Push Down button.
Making animations exportable
We have our shape key animations ready, but before we can export them we need to do a few more things. If we would export our mesh with the shape key animations right now, we would see that FBX file which we would export would not contain any animations in it. We need to assign actions to our shape key animations to get our animations exported.
Because we made 2 animations with different lengths, we will need to make 2 actions with different lengths.
- In the timeline switch Editing context to the Action Editor.
- Put the current frame to start frame as your previous shape key animations had. In my cases, it was frame 1.
- Make keyframe by hovering with the mouse pointer over 3D viewport and press I key, and then in the menu select Location. (It also works if you choose Scale or Rotation but I chose Location just because it was first on the list)
- Move the current frame to one of the shape key animations last frame. In my case, the first animation's last frame was frame 30.
- Now repeat step 3 to make another keyframe.
- In the timeline, press the Push Down button to finish the action.
- Repeat these steps for all other shape key animations. If you have shape key animations that have the same length, you don't have to make a new action for each animation, you can have one same length action for multiple animations.

In the image above you can see how the first action should look like before you press Push Down button.
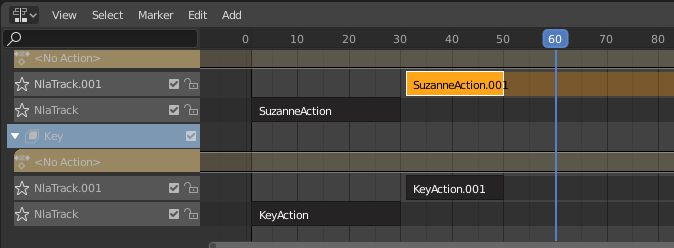
Now we need to align actions so they would match with the shape key animations in the Nonlinear Animation editor.
- In the timeline section switch from the Dope Sheet editor to the Nonlinear Animation editor.
- Open up Key tracks by clicking on the triangle next to Key section.
- Arrange animations in the queue and put actions with the same length over them. You can see an example in the image below. (You can also have all animations or actions to be on the same track. Also, if you have animations with the same length, you can duplicate the same action several times by selecting it and pressing Shift + D)
- Make sure, that between actions and animations are at least one frame gap, so animations would not interfere with each other.
- Test by playing the timeline by pressing Space or pressing Play button if all animations are playing. If sometimes all animations aren't playing, make sure that bottom track animations are set before top track animations.
Exporting animations
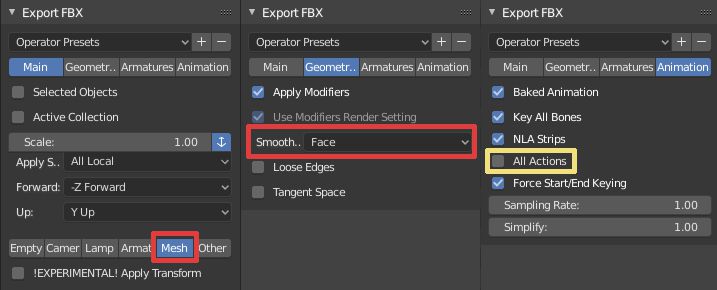
Now we are ready to export our mesh with the shape key animations.
- Click File -> Export->FBX (.fbx).
- Make sure, that in Main section Mesh is selected.
- In the Geometries tab set Smoothing to Face.
- In the Animation tab uncheck All Actions.
- Choose a place where to save and name for your file and press Export FBX.
Importing animations in UE4
To import morph target animations in UE4, we need to change some import settings.
- Make sure that Skeletal Mesh and Import Mesh is checked.
- Expand more mesh import settings and check Import Morph Targets.
- Check Import Animations.
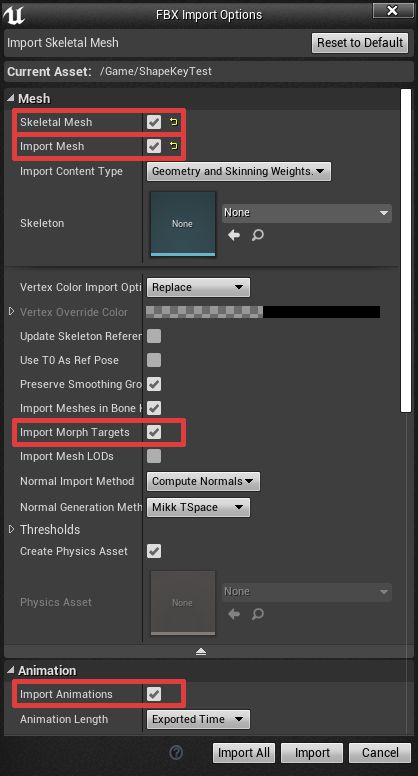
After import you should see Could not find bind pose warning, just ignore it. It's because we don't have armature for our mesh.
Now you should see several new items in your content browser and you should see 2 Animation Sequences which should contain Morph Target animations.
Short version
- Set project Unit Scale to 0.01 and Clip End distance to 100m.
- Add your mesh to the scene.
- Add shape keys to your mesh.
- Make some shape key animations.
- Push all your made animations down to NLA.
- Make for each animation length another action, where its start and end frame is Location or Rotation or Scale key and push all actions down to NLA.
- In NLA arrange animations so they would play after each other and have 1 free frame between them. You can place all animations on one track or make sure that the lower track animation are before higher track animations.
- For each animation arrange action with the same length over it. More info here.
- Make sure that all shape key animations are playing.
- Export with these settings.
- Import in UE4 with these settings.
Video
Share on
Related Articles
Default Clip Could Not Be Found In Attached Animations List
Source: https://continuebreak.com/articles/how-blender-shape-key-ue4-morph-target-animations/
0 Response to "Default Clip Could Not Be Found In Attached Animations List"
Post a Comment